Teie veebibrauser on aegunud ning ei toeta kõiki funktsioone.
Värksendage enda brauserit või laadige alla Chrome brauser siit
More about Migration
First things about users
Select "Users" from the sidebar and click "New user group".
Creating a new user group is divided into steps and you can navigate between steps with "Next" and "Previous" buttons located at the bottom of the setup modal. Added user rights can be later changed or removed as well.
1. Name your user group and select its type (optional; user groups with set types can be assigned to contracts and progress reports).
2. Add the e-mail aadress of a user you want to add to your project.
Next, assign a role that sets user rights for each functionality. After you've assigned the role, you can click on each single user right and manually edit them. Finish the process by clicking "Confirm user".
Repeat the process to add more users to the same user group.
Once all users are added, click "next" to proceed.
3. Select plan folders that user group members can access.
4. Select document folders that user group members can access.
5. Create access to taskboards
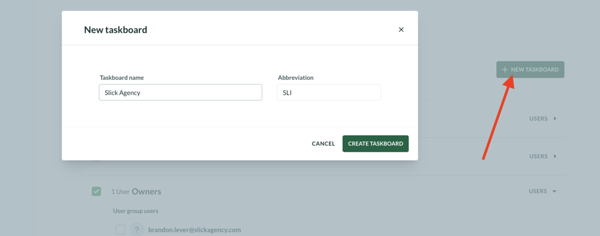
First, you can assign the user group to already existing taskboards. For that, check the boxes in front of taskboard in the list. Clicking on the triangle icon enables to exclude group members if you like to give access to only certain users.
You can also create a new taskboard by clicking on "+New taskboard". Insert the taskboard, its abbrevation (used for creating unique task id-s) and click on "Create taskboard". After that, you can elaborate access by each user by opening the user list from the triangle icon.
Click "Confirm and create" to finish creating the user group.


